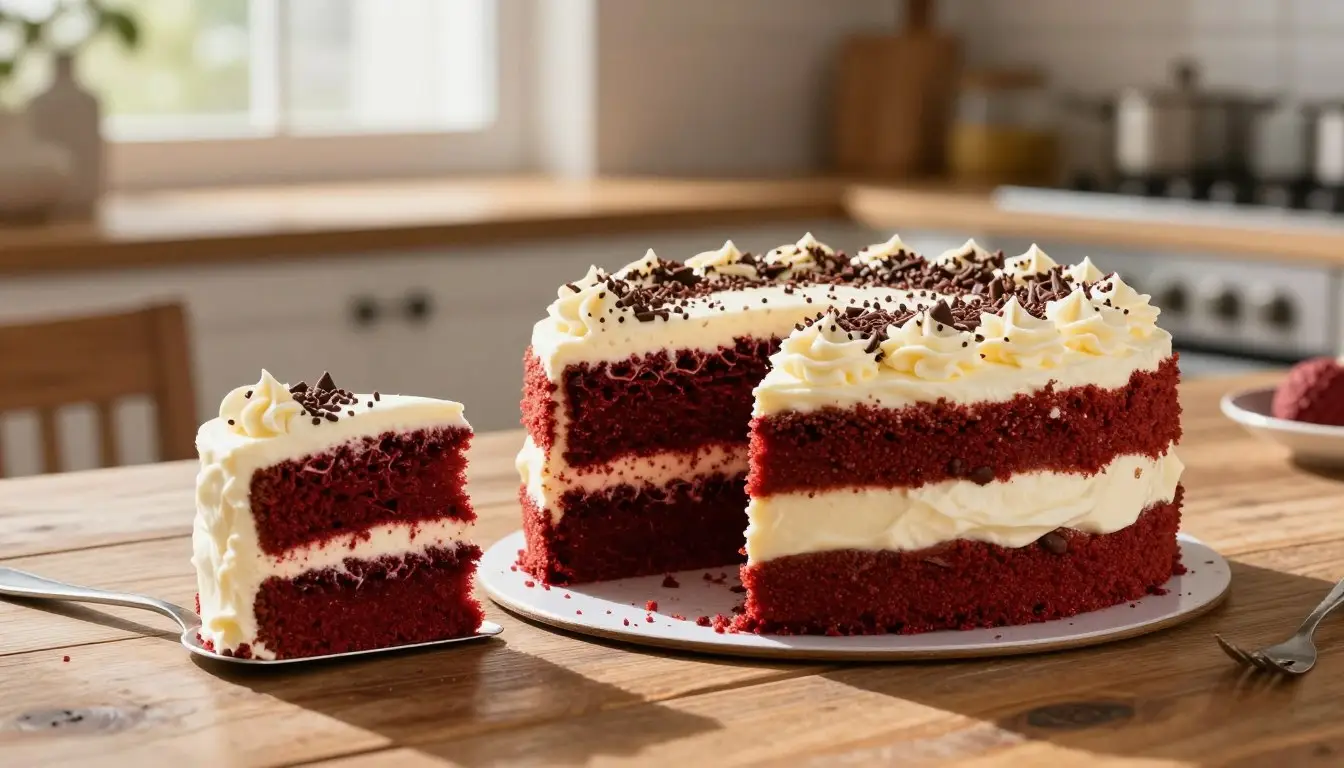
Moist and Flavorful Red Velvet Cake
Sharing a homemade dessert brings people together. You might remember a stunning, crimson treat at a holiday gathering. Its deep color promises something special, a mix of flavors that feels like a warm hug.
This classic moist red velvet cake recipe makes a treat so soft, it melts in your mouth. Getting the right mix of moisture and flavor is easier than you think. By following this guide, you will master the art of this beloved American tradition.
A legendary bake is more than sugar; it’s about memories with loved ones. Imagine the smell of cocoa and buttermilk in your home during a celebration. Follow this reliable recipe for a tender result every time, connecting to generations of passionate bakers.
Table of Contents
What Makes Red Velvet Cake Special
Red velvet cake is a classic dessert known for its deep red color and velvety texture. It’s a favorite that never fades. What makes it stand out? It’s the mix of vibrant color, smooth texture, and a taste that’s tangy yet subtly chocolatey.
The Signature Vibrant Color and Velvety Texture
The cake’s red color is its most famous feature. This color comes from cocoa powder, buttermilk, and red food coloring. The result is a stunning, deep red that looks as good as it tastes. The cake’s velvety texture is due to its fine crumb and moisture, making it a joy to eat.
The Unique Cocoa and Hints of Tang
Red velvet cake is like a vanilla cake with a hint of cocoa. The cocoa adds depth without taking over. The tanginess comes from buttermilk and baking soda, creating a unique flavor.
Let’s compare red velvet cake to traditional chocolate cake:
| Characteristics | Red Velvet Cake | Traditional Chocolate Cake |
|---|---|---|
| Primary Flavor | Vanilla with hint of cocoa | Rich chocolate |
| Texture | Moist and velvety | Can be dense and moist |
| Color | Deep red | Brown or dark brown |
A Brief History of This Southern Classic
Red velvet cake started in the Southern United States in the early 20th century. It became popular during the Great Depression as a cheap dessert. Today, it’s a beloved treat at Southern events, known for its unique taste and look.
When you make your own homemade red velvet cake, knowing its history makes it even more special.
Essential Ingredients for Your Red Velvet Cake
Red velvet cake is famous for its moist texture and unique taste. This is thanks to the right mix of ingredients. The perfect blend of dry and wet ingredients, along with special touches, makes your cake perfect.
Dry Ingredients: Flour, Cocoa, and Leavening Agents
The dry ingredients are the heart of your red velvet cake. They give it structure and flavor. You’ll need 2 cups of all-purpose flour for the base. 2 Tablespoons of unsweetened cocoa powder add a deep flavor and color.
Leavening agents like 1 teaspoon of baking soda and 1 teaspoon of baking powder help the cake rise. And 1 teaspoon of salt boosts the flavor.
| Dry Ingredient | Quantity | Role |
|---|---|---|
| All-purpose Flour | 2 cups | Provides structure |
| Unsweetened Cocoa Powder | 2 Tablespoons | Adds flavor and color |
| Baking Soda | 1 teaspoon | Leavening agent |
| Baking Powder | 1 teaspoon | Leavening agent |
| Salt | 1 teaspoon | Enhances flavor |
Wet Ingredients: Oil, Eggs, and Vanilla
The wet ingredients make your cake moist, rich, and flavorful. Oil keeps it moist instead of butter. Eggs add structure and richness. And vanilla gives a sweet flavor.
Why Buttermilk Is Non-Negotiable
Buttermilk is key in red velvet cake. It adds a tangy flavor and helps the cake rise. If you don’t have buttermilk, mix 1 cup of milk with 1 tablespoon of white vinegar or lemon juice. Let it sit for a few minutes before using.
Choosing Between Liquid and Gel Food Coloring
To get the red velvet color, you need food coloring. You can use liquid or gel food coloring. Gel coloring is more concentrated, so you need less. Your choice depends on what you prefer and what’s available.

Kitchen Tools and Equipment You’ll Need
The right tools are key to baking a perfect red velvet cake. To make your homemade red velvet cake just right, you’ll need some basic kitchen tools and equipment.
Essential Mixing Bowls and Utensils
First, get your mixing bowls and utensils ready. You’ll need two large mixing bowls, one for dry ingredients and one for wet. A stand mixer is best for creaming butter and sugar and beating eggs. If you don’t have a stand mixer, a hand mixer will work, but it might take more effort.
You’ll also need a whisk for mixing dry ingredients, a rubber spatula for scraping bowls, and measuring cups and spoons for precise measurements.
Choosing and Preparing Your Cake Pans
This red velvet cake recipe calls for three 8-inch cake pans. These pans help bake the layers evenly and achieve the right height. Make sure your pans are in good shape to prevent the cake from sticking. Round or springform pans work well, but springform pans are easier for removing the cakes.
Before adding the batter, grease your pans with butter or cooking spray and dust them with flour. This step is key for easy cake removal after baking.
Optional Tools for Professional Results
For a professional look, consider a few optional tools. A cake leveler ensures your cake layers are even, making assembly easier. A turntable is also handy for frosting and decorating, letting you spin the cake as you work.
Lastly, a piping bag and tips can help you create decorative borders and patterns. These add a personal touch to your homemade red velvet cake.
Red Velvet Cake Recipe: Step-by-Step Instructions
Making a red velvet cake is an art that requires careful steps for a moist and tasty result. It’s important to follow these steps closely. Each step plays a key role in the final cake.
Prepping Your Ingredients and Preheating the Oven
Start by measuring out all your ingredients. You’ll need dry items like flour, cocoa powder, and sugar. Also, have your wet ingredients like oil, eggs, and buttermilk ready. Preheat your oven to 325°F (165°C). Grease and flour two 9-inch round cake pans well to help the cakes come out easily.

Combining Dry and Wet Ingredients
In a big mixing bowl, mix your dry ingredients: flour, cocoa powder, sugar, baking powder, and salt. In another bowl, mix your wet ingredients: oil, eggs, buttermilk, and vanilla extract. Make sure your buttermilk is well mixed as it’s key for the cake’s moisture.
- Whisk dry ingredients until well combined.
- Mix wet ingredients until smooth.
Adding Color and the Vinegar-Baking Soda Reaction
Now, mix your wet and dry ingredients together. Add the wet ingredients to the dry and mix until just combined. Then, add your food coloring for that red velvet look. The vinegar and baking soda will make your cake rise and be light.
- Add wet ingredients to dry ingredients and mix.
- Add food coloring and mix until the color is evenly distributed.
Baking Time, Temperature, and Doneness Tests
Pour the batter into the pans and bake for 30-35 minutes. Watch your cakes as oven temperatures can differ. When done, let them cool in the pans for a few minutes. Then, transfer them to a wire rack to cool completely.
Creating the Perfect Cream Cheese Frosting
Making the perfect cream cheese frosting is an art that takes your red velvet cake to the next level. It’s all about finding the right mix of tanginess and sweetness. With a few simple steps, you can make a frosting that’s silky smooth and tastes amazing.
The Classic Cream Cheese Frosting Formula
The key to a great cream cheese frosting is its basic ingredients: cream cheese, butter, vanilla extract, and powdered sugar. High-quality cream cheese is a must. It gives the frosting a tangy flavor that pairs well with the red velvet cake’s cocoa notes.
To begin, you’ll need:
- 8 ounces of cream cheese, softened
- 1/2 cup of unsalted butter, softened
- 2 teaspoons of vanilla extract
- 2 cups of powdered sugar, sifted
Mixing Techniques for Silky Smooth Frosting
Start by beating the cream cheese and butter with the paddle attachment of an electric mixer. Do this on medium-high speed until they’re smooth and creamy. This step is key to avoiding lumps and getting a uniform texture. Make sure to beat in the vanilla extract well so it’s spread evenly.
Slowly add the sifted powdered sugar, beating well after each addition. This helps prevent lumps and keeps the frosting smooth.
Adjusting Sweetness and Adding Flavor Variations
Cream cheese frosting is versatile. You can tweak the sweetness by adding more or less powdered sugar. For a twist, try adding a pinch of salt or a tablespoon of lemon juice to boost the flavors.
Playing with different flavors can be fun too. Adding a teaspoon of orange or lemon zest can give your frosting a fresh and unique taste.
Assembly and Decorating Your Red Velvet Cake
Now that your red velvet cake layers are baked perfectly, it’s time to put them together. This step is crucial for a cake that looks as good as it tastes. It involves several important steps.
Cooling Your Cake Layers Completely
Before you start, make sure your cake layers are cool. This step is key to prevent frosting from melting. It also keeps your cake stable. Let your cakes cool in the pans for a few minutes before moving them to a wire rack.
Leveling Layers for Even Stacking
To make your cake look even and appealing, level your layers. Use a cake leveler or a serrated knife to remove any unevenness. This step is vital for a professional finish.
Place one cake layer, flat-side up, on a cake plate or pedestal. Use parchment strips under the edges to keep the plate clean. This trick saves you from cleaning up later.
The Crumb Coat and Final Frosting Layer
Apply a thin layer of frosting to trap crumbs. This is called a crumb coat. Chill the cake for 10-15 minutes to set it. Then, add a final layer of frosting. Use an offset spatula to smooth it out.
Decorating Ideas: From Simple to Spectacular
Your red velvet cake can be decorated in many ways. Use fresh flowers, chocolate shavings, or intricate piping designs. For a dramatic look, use a turntable to show off your cake.
Remember, decorating a cake takes patience and practice. Don’t be afraid to try new techniques to find what works for you.
Secrets to Keeping Your Red Velvet Cake Moist
To make a moist red velvet cake, knowing what makes it stay moist is key. It’s all about the right mix of ingredients and how you bake it.
Understanding Moisture Retention in Cakes
What makes cakes moist is the mix of ingredients. Buttermilk is a big player because it’s acidic and full of moisture. It reacts with baking soda to make the cake tender.
The fat you use also matters. Oil keeps the cake moist because it stays liquid, unlike butter which hardens.
The Perfect Balance of Fat and Liquid
Finding the right mix of fat and liquid is crucial. Too little fat makes the cake dry, while too much makes it heavy. The liquid must be just right to keep it moist without being too wet.
| Ingredient | Role in Moisture Retention |
|---|---|
| Buttermilk | Provides moisture and tenderness |
| Oil | Contributes to moist texture |
| Eggs | Binds ingredients and adds moisture |
Why Overmixing Ruins Texture
Overmixing can make the cake dense and tough. Mix wet and dry ingredients separately and gently combine them. This helps keep the cake’s delicate texture.
Adding a cup of coffee can also improve the flavor, showing the importance of balancing ingredients.
“Even if you have to run to Mickey D’s or the gas station to get a cup of coffee! I prefer flavored coffee.”
Preventing Dry Cake Through Proper Baking
Proper baking is key to avoiding a dry cake. Make sure your oven is at the right temperature and don’t overbake. Using a water bath can also help keep the cake moist.
By following these tips, you can make a moist and tasty red velvet cake that will wow your guests.
Common Mistakes and How to Avoid Them
Making the perfect red velvet cake can be tricky. You might end up with a cake that’s not right in texture, color, or taste. Knowing the common mistakes can help you avoid them and make a great cake.
Fixing Dull or Uneven Color
The red color of a red velvet cake is what makes it special. But getting that color right can be hard. To fix a dull or uneven color, make sure you’re using the right food coloring. Liquid food coloring might not mix as well as gel or paste.
If your color isn’t right, try changing to a more concentrated coloring. This can help you get the vibrant red you want.
- Use high-quality food coloring made for baking.
- Mix the coloring well into the batter to avoid streaks.
- Try using gel or paste food coloring for a brighter color.

Solving Dense or Dry Texture Issues
A dense or dry cake is a big letdown. Overbaking is a common reason for this. So, keep an eye on your cake while it’s baking.
As one expert says, “Don’t overbake this layer cake! A few extra minutes can make it dry and lose its soft, velvety texture.” Check your cake often towards the end of baking. Use a toothpick to see if it’s done.
- Check your cake often towards the end of baking.
- Use a toothpick to test for doneness.
- Avoid mixing the batter too much to prevent a dense cake.
Preventing Runny or Grainy Frosting
The cream cheese frosting is key to a best red velvet cake recipe. But it can be tricky. To avoid a runny or grainy frosting, make sure your cream cheese is room temperature. Also, don’t overbeat the frosting, as it can become too thin or separate.
- Use room temperature cream cheese for smooth frosting.
- Avoid overbeating the frosting.
- Add powdered sugar slowly to get the right consistency.
Storage, Serving, and Make-Ahead Tips
After baking and frosting your homemade red velvet cake, keeping it fresh is key. The right storage and serving methods help keep the cake moist and tasty.
Short-Term Storage at Room Temperature
For a short time, you can store your cake at room temperature. Use an airtight container to keep it moist. It stays fresh for up to 6 hours. If you can’t serve it in 6 hours, refrigerate it to keep it fresh longer.
Refrigerating and Freezing for Later
For longer storage, refrigerate or freeze your cake. Refrigeration works for up to 3 days. Just cover it with plastic wrap or foil. For longer storage, freeze it. Wrap it tightly in plastic and foil before freezing.
| Storage Method | Duration | Notes |
|---|---|---|
| Room Temperature | Up to 6 hours | Store in an airtight container |
| Refrigeration | Up to 3 days | Cover with plastic wrap or aluminum foil |
| Freezing | Up to 2 months | Wrap tightly in plastic wrap and aluminum foil |
Bringing Your Cake to Perfect Serving Temperature
Before serving, let your red velvet cake come to room temperature. This ensures the best taste and texture. Take it out of the fridge about 2 hours before serving. If it’s frozen, thaw it overnight and then let it sit at room temperature for an hour.
Creative Variations on the Classic Recipe
Red velvet cake is a versatile dessert that can be adapted to suit any occasion or taste preference. Whether you’re looking to make a different presentation or add new flavors, there are countless ways to creatively vary this classic recipe.
Converting to Red Velvet Cupcakes
Want cupcakes? Check out these red velvet cupcakes! Converting your red velvet cake recipe into cupcakes is a great way to offer individual servings. To do this, simply divide the batter evenly among cupcake liners and adjust the baking time to about 15-20 minutes, or until a toothpick inserted into the center comes out clean.
Keep in mind that the yield will depend on the size of your cupcake liners. Typically, you can expect to get around 12-15 standard-sized cupcakes from a single batch of red velvet cake mix.
Making a Red Velvet Sheet Cake
For larger gatherings, consider making a red velvet sheet cake. This involves pouring the batter into a large, shallow pan and baking it until done. The result is a cake that’s perfect for slicing into numerous servings.
To make a sheet cake, you’ll need to adjust the baking time. A standard 9×13 inch pan will typically take around 30-40 minutes to bake. Ensure you check for doneness by inserting a toothpick into the center; it should come out clean or with a few moist crumbs.
Fun Flavor Additions and Mix-ins
One of the joys of baking is experimenting with new flavors and mix-ins. For red velvet cake, some fun additions include nuts (walnuts or pecans work well), chocolate chips, or even dried fruit like cranberries.
You can also play with different extracts, such as adding a hint of orange or almond to complement the cocoa and vanilla flavors. The key is to balance your additions so they enhance the cake without overpowering it.
By incorporating these creative variations into your baking repertoire, you can keep your red velvet cake recipe fresh and exciting. Whether you’re making cupcakes, a sheet cake, or experimenting with new flavors, the classic easy red velvet cake recipe provides a solid foundation for your culinary creativity.
Conclusion
Now you know how to make a moist and tasty red velvet cake. With the right ingredients, tools, and techniques, you’re ready to bake a stunning cake. It will impress everyone.
Follow the steps in this article to make a moist red velvet cake. It’s perfect for any event. The cake’s vibrant color, velvety texture, and cocoa flavor will make it a hit.
I hope you enjoy making and eating this red velvet cake as much as I do. With practice, you’ll become a pro at making moist red velvet cakes. They’ll become a favorite in your family. So, start baking and share this special dessert with your loved ones.